2026. 05. 12.
Bambu Lab A1 and A1 Mini – Factory First Layer Issues
Bambu Lab A1 and A1 Mini – Factory First Layer Issues Several users of the Bambu Lab A1 and Bambu Lab A1 Mini printers have reported strange first layer issues that at first seem like slicer or filament problems, but are often actually caused by mechanical issues.
Bambu Lab A1 and A1 Mini – Factory First Layer Issues
Several users of the Bambu Lab A1 and Bambu Lab A1 Mini printers have reported strange first layer issues that at first seem like slicer or filament problems, but are often actually caused by mechanical issues.
Typical symptoms shown in the video:
wavy or “plowed” first layer
uneven adhesion
nozzle printing too close to the bed
random over- or under-extrusion
rough, textured surface already on the first layer
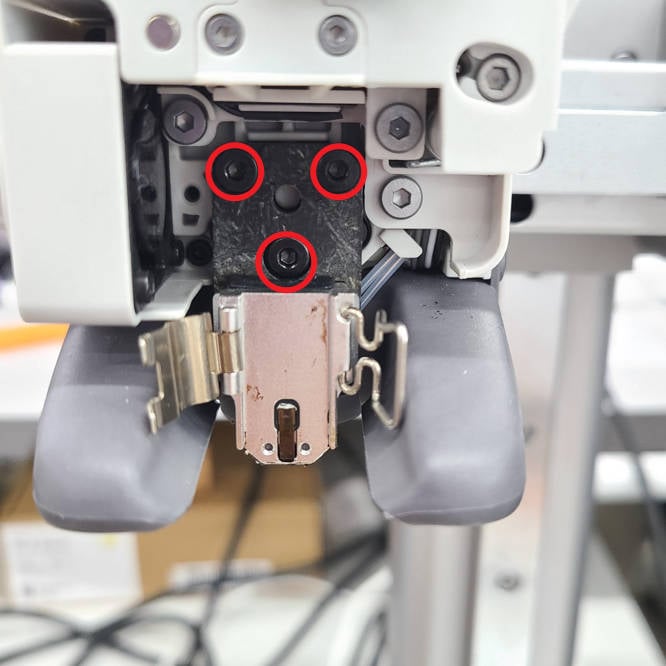
One of the most common causes of the issue is that the mounting screws on the hotend heating assembly can loosen over time. As a result, the nozzle can make tiny movements during printing that the automatic bed leveling system can no longer properly compensate for.
This issue is especially misleading because:
the printer completes auto leveling,
the Z-offset is theoretically automatic,
yet the first layer still turns out badly.
Based on community experience, the following steps often solve the problem:
Remove the hotend cover
Check and tighten the screws on the back of the heating assembly
Thoroughly clean the build plate
Run a new auto bed leveling process
Check the condition of the nozzle
The issue is also mentioned on Bambu Lab’s official troubleshooting page, where they emphasize that hotend mechanical stability is critical for first layer quality on the A1 series. Bambu Lab guide for first layer issues
The video clearly demonstrates that even modern, highly automated 3D printers can suffer from “factory” issues that ultimately come down to tightening a few small screws.
Several users of the Bambu Lab A1 and Bambu Lab A1 Mini printers have reported strange first layer issues that at first seem like slicer or filament problems, but are often actually caused by mechanical issues.
Typical symptoms shown in the video:
wavy or “plowed” first layer
uneven adhesion
nozzle printing too close to the bed
random over- or under-extrusion
rough, textured surface already on the first layer
One of the most common causes of the issue is that the mounting screws on the hotend heating assembly can loosen over time. As a result, the nozzle can make tiny movements during printing that the automatic bed leveling system can no longer properly compensate for.
This issue is especially misleading because:
the printer completes auto leveling,
the Z-offset is theoretically automatic,
yet the first layer still turns out badly.
Based on community experience, the following steps often solve the problem:
Remove the hotend cover
Check and tighten the screws on the back of the heating assembly
Thoroughly clean the build plate
Run a new auto bed leveling process
Check the condition of the nozzle
The issue is also mentioned on Bambu Lab’s official troubleshooting page, where they emphasize that hotend mechanical stability is critical for first layer quality on the A1 series. Bambu Lab guide for first layer issues
The video clearly demonstrates that even modern, highly automated 3D printers can suffer from “factory” issues that ultimately come down to tightening a few small screws.